This page is intended for Lower Columbia College web editors using Omni CMS to update our Public website or Internal website, with notes for those who manage other institutional websites. If you have not already, please familiarize yourself with the General Content Accessibility Guidelines, which are prerequisite to the guidelines below.

Links & Buttons

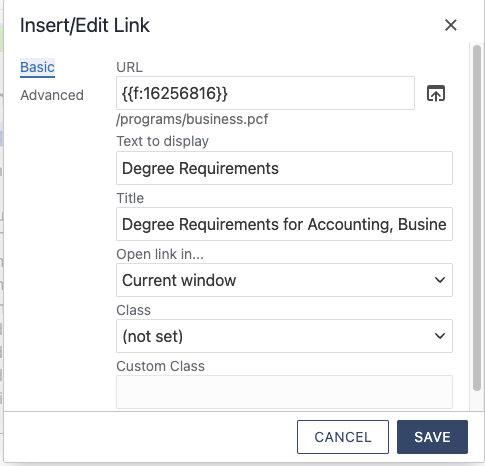
A link (or button component) is comprised of three main components: URL, Link Text, and Title. 

URL

In Omni CMS the URL field can be a plaintext link (e.g. https://www.example.com), or a dependency tag as shown in the example below (e.g. https://lowercolumbia.edu/programs/business.php). This tells the browser where to send the user when they click on a link, but is terribly useful visually, and especially not useful for screen reader users, who may have the URL text read to them one character at a time. For these reasons, there needs to be a text component to links, which will be read in place of the URL for the benefit of sighted and non-sighted users.

Link Text (Text to Display)

The text that will be displayed in place of the URL. This field is technically optional, because sometimes you'll want to use an image or an icon as a link, but it should generally be used, because the URL alone is ineffective in communicating the intention of the link. The Link Text should be descriptive enough that a user will know where they will be taken by the link without relying on visual context, which they may not have. 

Title/Aria-Label

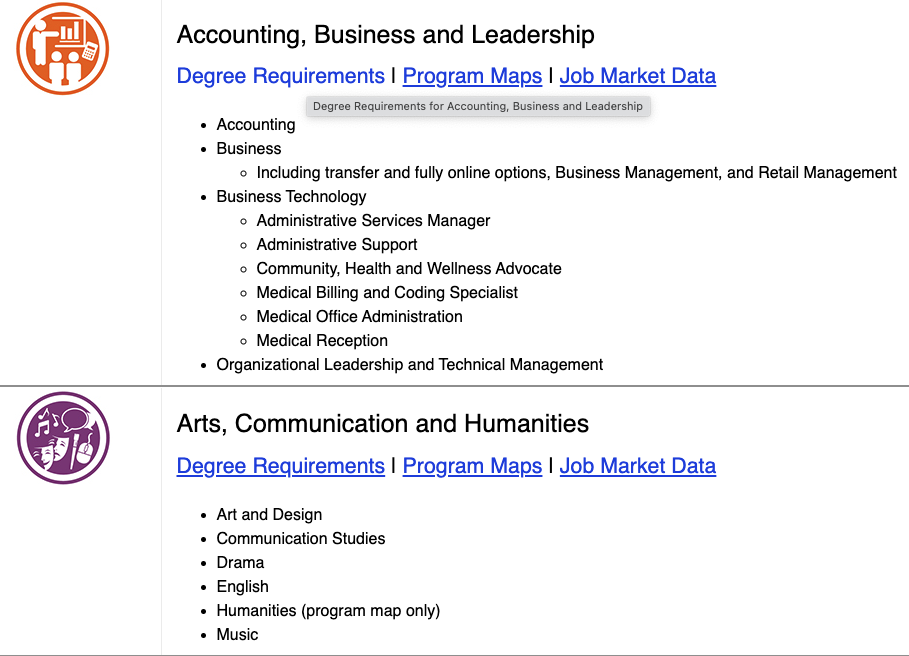
The title attribute is a field which displays more information about the link when a user hovers over it (see the screenshot of the Programs of Study page below). This is an optional field for links that need further context, and should not be over- used. Best practices for use of the title attribute are as follows:

  • The title and link text attribute should NOT be identical to the Link Text. This provides no new visual or audio information, and the redundancy it creates has a negative impact on user experience
  • The title should be used to distinguish links with identical Link Text on page. For example, if a page has 10 "Learn More" links, this field can be used to provide more context, like what the user will learn more about if they click the link. Remember, they might not have the visual context of the link's location on the page, and may be relying only on the combination of Link Text and Title fields.
  • The title attribute, if used, should start with the link text. For example is the Link Text is "Learn More", then the Title may be "Learn More about Running Start", but should not be "Running Start". This is a best practice that helps ensure consistency, clarity and cohesion so that users don't have to do any mental gymnastics to piece together the purpose of the link from the two fields.

Not using Omni CMS?

Please note that your Web Team has saved you some time by making your input into the title field automatically populate both the title and aria-label attributes of the link, so you don't have to worry about the aria-label when working in Omni CMS. In most other systems, the aria-label attribute should be used anytime the title attribute is used, and should contain the same text as the title attribute. The title attribute alone only shows the hover text visually, but does not share that information with screen readers. To ensure accessibility of your links outside of Omnis CMS the aria-label attribute also should be used to give any needed context to a link non-visually.

Example from the Programs of Study page:

In this example, the page is split into sections by Career Pathway, and each section contains links to the Degree Requirements, Program Maps, and Job Market Data for that Career Pathway. This results in identical links, because descriptive links would clutter the page unnecessarily. To distinguish between these links, we use the title/aria-label attribute(s) to provide more contextual information about each of these links on hover or tab focus.

A screenshot of the link dialog in the Omni CMS editor. There are 3 relevant fields: URL, Text to display, and Title. The URL is a dependency tag referencing the business programs page, the text to display says "Degree Requirements", and the title says "Degree Requirements for Accounting, Business and Leadership"
A screenshot of the Programs of study page which displays 3 links for each career pathway. Each set of 3 links is visually identical: Degree Rquirements, Program Maps, and Job Market Data. One link is hovered, showing the title attribute's text which distinguishes these identical links.

Embedded Videos

The video embed tool in Omni CMS is a little sensitive, and for this reason, it is usually a good idea to leave embedding videos to your Web Team. However, it is always okay to try it yourself and come to us if you run into issues. There are two main platforms we tend to embed video content from: YouTube and Vimeo. For either, you will start by clicking the "Insert/edit media" button in the toolbar of edit mode shown in the image below.

A screenshot of the Omni CMS edit mode toolbar. There are a lot of buttons, but the relevant one is being hovered over to show the "Insert/edit media" title text. This button is in the second row of the toolbar near the middle.

From there, both of these platforms will be embedded slightly differently.

Pasting Link into Source (Preferred Method for YouTube Embedding)

If you copy the link from theYouTube URL and paste it into the Source field of the Insert/Edit Media dialog's General tab (shown below), then the width and height fields will autofill. This is the preferred method because it automatically converts HTML embed code to the less forgiving XML that our CMS (Omni CMS) uses. 

A screenshot of the General tab of the Insert/Edit Media dialog. The fields shown are: Source, Width, and Height, with a Cancel button and a Save Button at the bottom of the dialog. There are two other tabs which are inactive, so their fields are not shown: Embed, and Advanced.

Now, to make your embedded video truly accessible, it will need a title, which does not automatically get added by pasting the link into the source field. To do this, go to embed tab of this dialog (after you have already pasted the link) and insert the title attribute below into the <iframe> element.

 title="Replace this Text with the name of the YouTube video" 

Incomplete YouTube Embed

The screenshot below shows what the Embed tab of the Insert/Edit Media dialog will look like after the link has been inserted in the Source field of the General tab, but before a title has been added.

A screenshot of the Embed tab of the Insert/Edit Media dialog. There is one large text box labelled "Paste your embed code below", with an HTML iframe element containing attributes from YouTube as the value of the textbox field. There are two other tabs which are inactive, so their fields are not shown: General and Advanced

Complete YouTube Embed

The screenshot below shows what the Embed tab of the Insert/Edit Media dialog will look like after the title attribute above is inserted. 

A screenshot of the Embed tab of the Insert/Edit Media dialog. There is one large text box labelled "Paste your embed code below", with an HTML iframe element containing attributes from YouTube as the value of the textbox field. Notably, there is a title attribute highlighted, which was not present in the previous screenshot. There are two other tabs which are inactive, so their fields are not shown: General and AdvancedNote that there must be a space between the newly added attribute key value pair and all other attribute key value pairs, and that the attribute must come before the > character which signifies the end of the iframe element tag.


Developer's Note: Copying the embed code from YouTube requires setting the allowfullscreen attribute to some true value like ="1" or "allowfullscreen" because XML (which Omni CMS uses) doesn't allow empty attribute values while HTML (which YouTube uses) does.

Pasting Embed Code (Preferred Method for Vimeo Embedding)

To copy the embed code from Vimeo, go to the Manage page for the video or livestream event you wish to embed and find the embed button. This will open a dialog with a large textbox and two options: "Responsive" and "Fixed". With the Responsive option chosen, copy the entire contents of the textbox into the "Paste your embed code below:" field of the Insert/Edit Media dialog's Embed tab (shown below)

A screenshot of the Embed tab of the Insert/Edit Media dialog. There is one large text box labelled "Paste your embed code below", which is empty. There are two other tabs which are inactive, so their fields are not shown: General and Advanced

This method has the advantage of generating the title field for you, unlike the method above for YouTube, and doesn't require any further tuning. You can simply click save and move on.

Known Issues

  • The currently known issue with Vimeo embeds is that they can't be editted. If you click on the embed you created and then open the Insert/Edit Media dialog again, the fields will be empty so you'll have to just delete the embed and start over from scratch. See the next issue for why that becomes difficult.
  • All embeds are really hard to delete from edit mode. You may be able to backspace the embed out of view, but it will still be there in the background causing problems, particularly for users of screen readers. If an embed needs to be deleted, the surest way is to remove it from the < > Source tab instead of the Edit tab to ensure all traces of it are gone. If you do not have access to the < > Source tab, please contact your Web Team to perform this removal for you.

Check Your Work


Contact Accessibility Coordinators

  Director of IT Services/Technology Accessibility Coordinator

   (360) 442-2251
Fax: (360) 442-2259

  Mary Kate Morgan/Director of Disability and Access Services & Special Populations

   (360) 442-2341
  mmorgan@lowercolumbia.edu